> For the complete documentation index, see [llms.txt](https://docs.defguard.net/llms.txt). Markdown versions of documentation pages are available by appending `.md` to page URLs; this page is available as [Markdown](https://docs.defguard.net/2.2/using-defguard-for-end-users/desktop-client/instance-configuration.md).

# Instance configuration

In this guide, you will learn how to add, remove and update Instance in Defguard desktop client.

{% hint style="warning" %}
Defguard Desktop Client is required if you want to use Multi-Factor Authentication, as any other WireGuard client doesn't support this functionality.
{% endhint %}

### Obtaining URL and Token

{% hint style="info" %}
If you are looking for how to generate tokens for your users as an Administrator, look here:

[Adding client device](/2.2/features/wireguard/remote-desktop-activation.md)
{% endhint %}

1. Log in to your Defguard account.
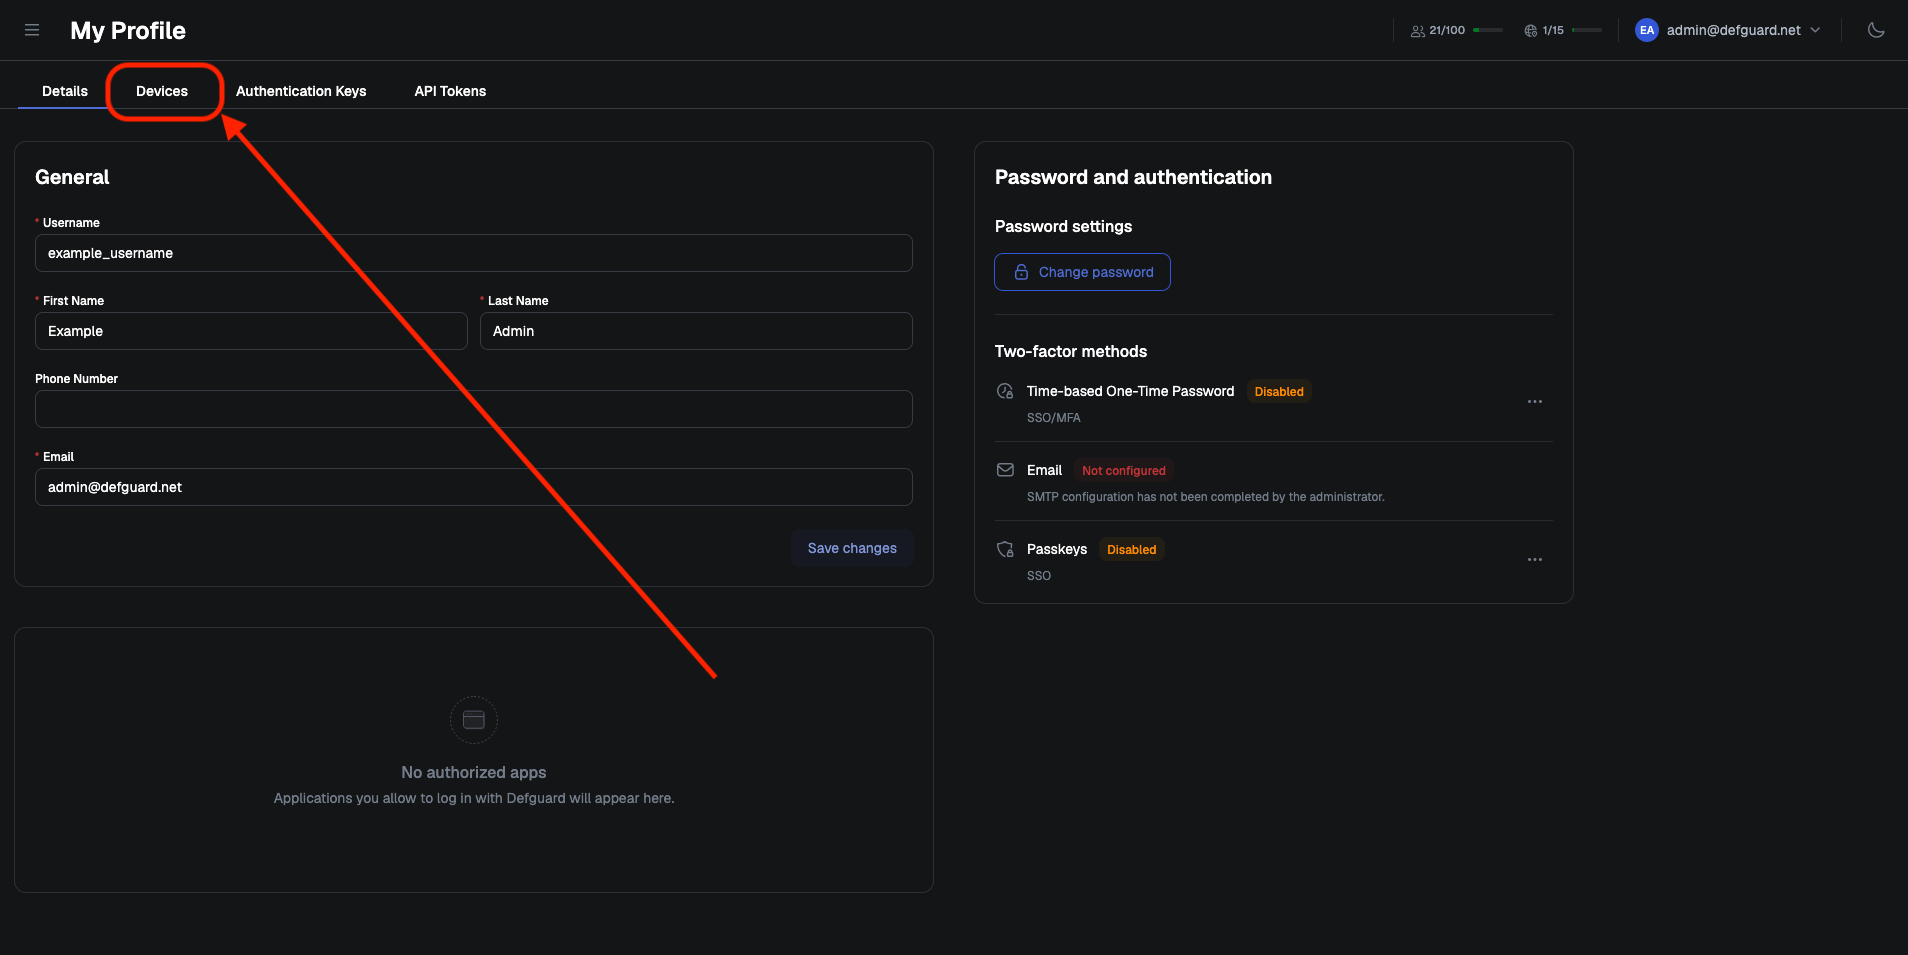
2. Go to **My Profile** tab and select **Devices** tab.

<figure><img src="https://content.gitbook.com/content/pE5yODhpiy5pT1XxY0BS/blobs/eKEOkHnnwGDmxOi8QhXk/defguard-myprofile-tab-devices-tab-marked.png" alt="" width="50%"><figcaption></figcaption></figure>

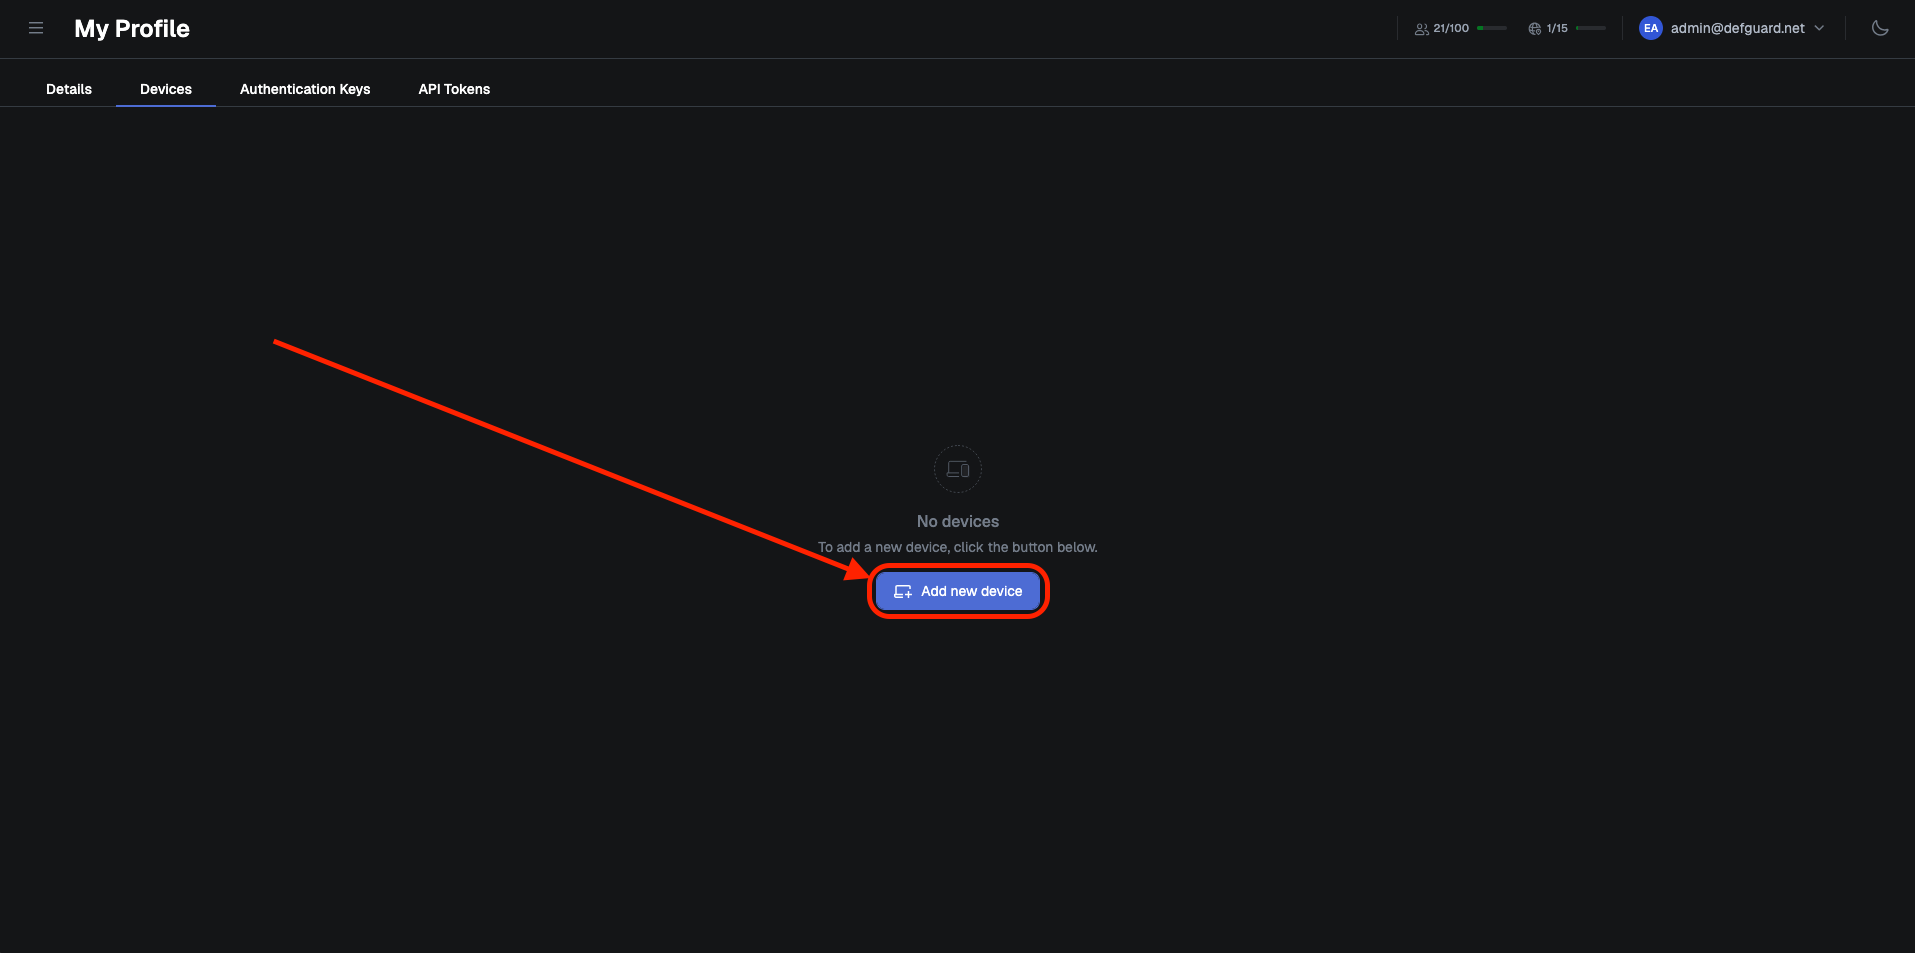
3. Click **Add new device** button.

<figure><img src="https://content.gitbook.com/content/pE5yODhpiy5pT1XxY0BS/blobs/eNlqa73Nl9pXR5I2Yh2A/defguard-devices-add-new.png" alt="" width="50%"><figcaption></figcaption></figure>

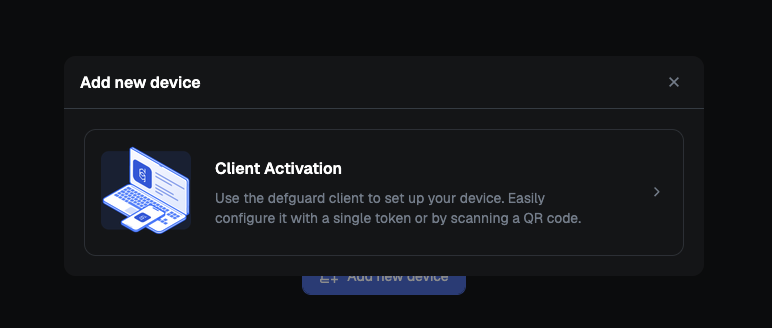
4. Click **Client Activation**.

<figure><img src="https://content.gitbook.com/content/pE5yODhpiy5pT1XxY0BS/blobs/R6q72ztgyFLtQeiMK527/client-activation.png" alt="" width="50%"><figcaption></figcaption></figure>

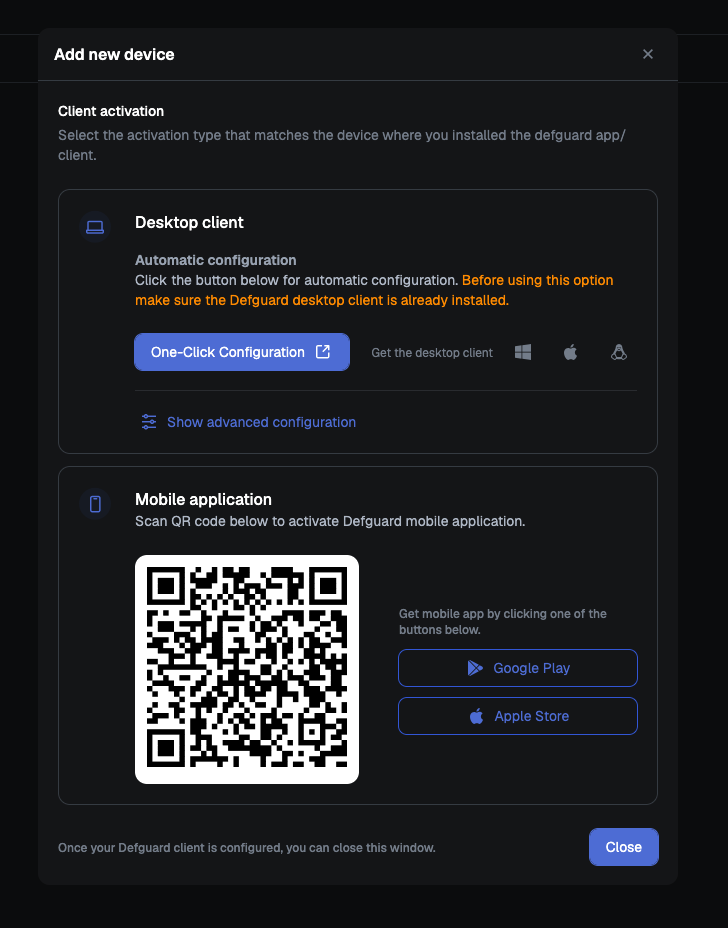
5. Afterwards, use **One-Click Configuration** or click **Show advanced configuration** and copy **URL** and **Token** manually.

<figure><img src="https://content.gitbook.com/content/pE5yODhpiy5pT1XxY0BS/blobs/tRSaGw4VArqtFxixM7l9/client-activation-instance-configuration.png" alt="" width="375"><figcaption></figcaption></figure>

### Manually Adding Instance

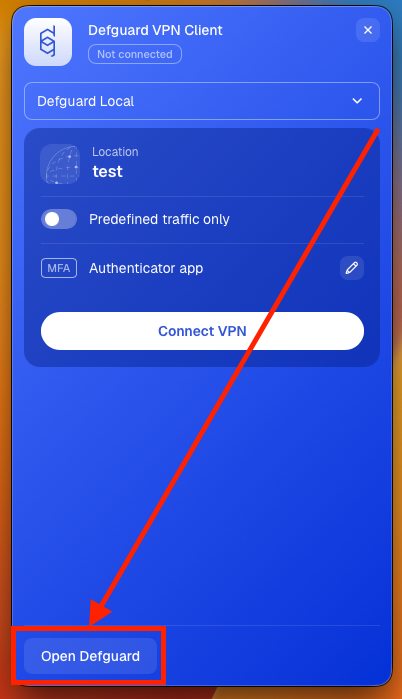
1. If you don't have **Defguard** in full view mode, open **Defguard** from tray view, and click **Open Defguard**

<figure><img src="https://content.gitbook.com/content/pE5yODhpiy5pT1XxY0BS/blobs/gSvbFh6HU6TjHK3rC307/tray-view-open-defguard-marked.png" alt="" width="50%"><figcaption></figcaption></figure>

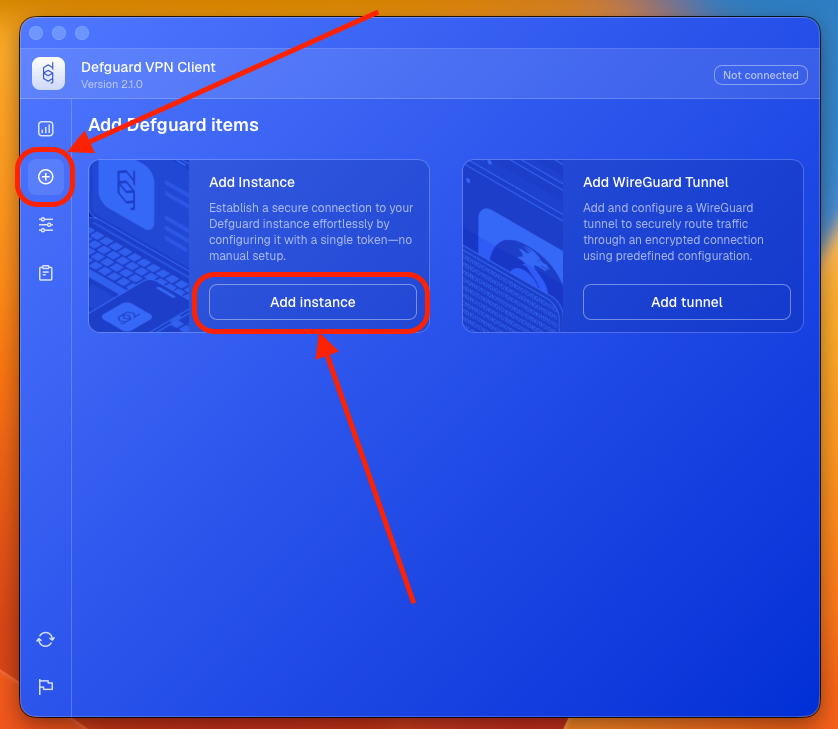
2. Click **Add Instance**.

<figure><img src="https://content.gitbook.com/content/pE5yODhpiy5pT1XxY0BS/blobs/zZpQYQtN1nGj0lUbsTEA/add-instance-full-view.png" alt=""><figcaption></figcaption></figure>

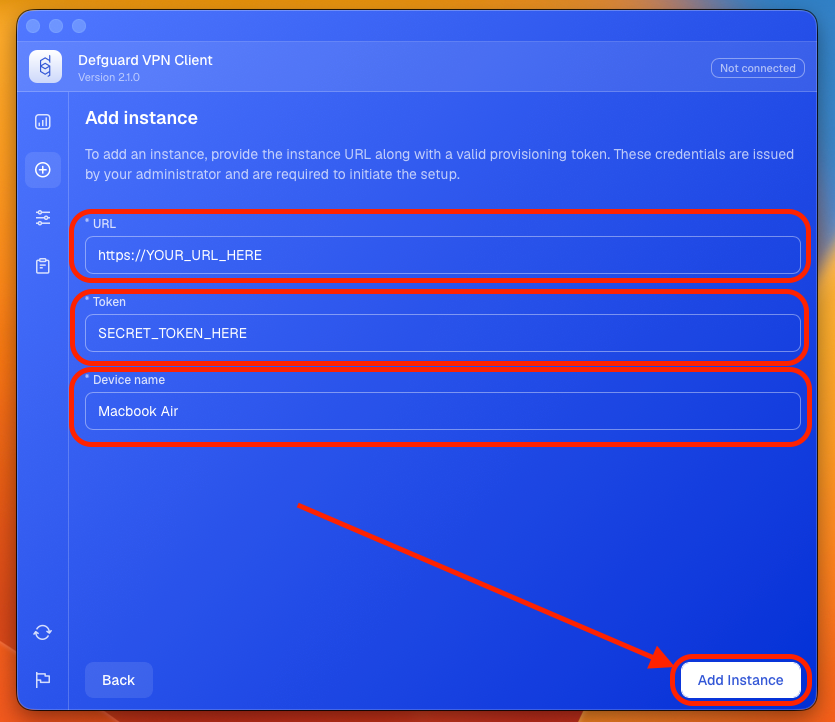
3. Enter URL, Token and Device name of your choice, then click **Add Instance**. (If you don't have URL/Token, check out [this section](#obtaining-url-and-token))

<figure><img src="https://content.gitbook.com/content/pE5yODhpiy5pT1XxY0BS/blobs/3uOfkvHVtPjrpXRKLSNk/add-instance-credentials.png" alt=""><figcaption></figcaption></figure>

### One-click Desktop Configuration

You can skip the whole process of entering the token/URL by clicking "One-Click Desktop Configuration". Here is a video describing the whole process:

{% embed url="<https://www.youtube.com/embed/q5-AXOPLgHc>" %}

### Connecting to Instance

#### Desktop client in full view mode

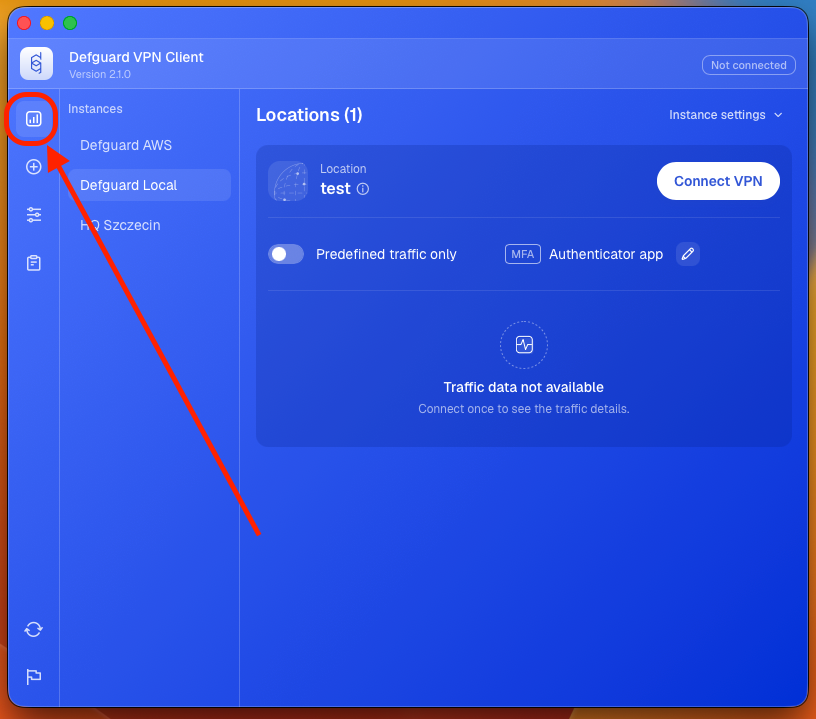
1. Go to **Instances**

<figure><img src="https://content.gitbook.com/content/pE5yODhpiy5pT1XxY0BS/blobs/khSibmmn0Dtj2vULKJjO/instance-view-marked.png" alt=""><figcaption></figcaption></figure>

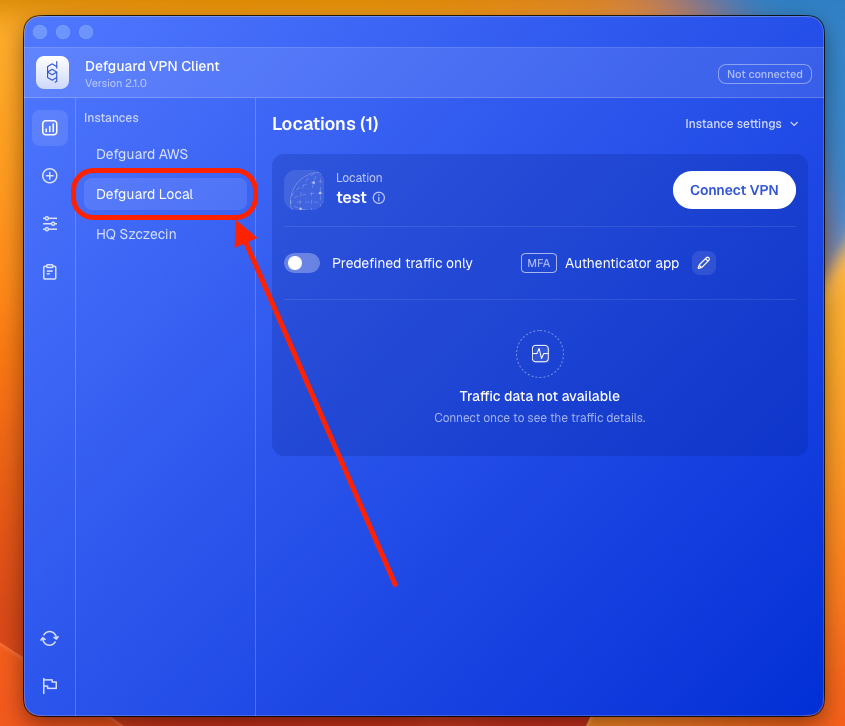
2. Select the instance you want to use

<figure><img src="https://content.gitbook.com/content/pE5yODhpiy5pT1XxY0BS/blobs/WQcU8zsPozLEzyVFzU0j/selected-instance-marked.png" alt=""><figcaption></figcaption></figure>

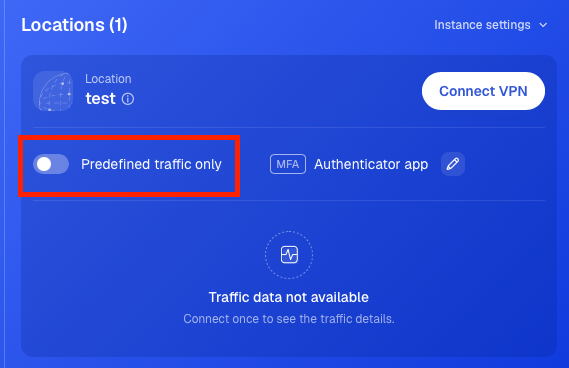
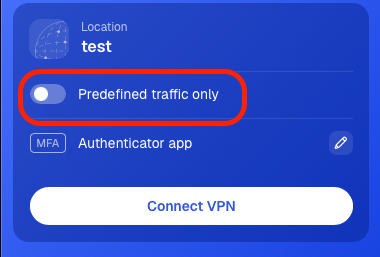
3. Choose allowed traffic

{% hint style="info" %}

* **Predefined traffic only** will only route traffic specified by your administrator.
* **All traffic is allowed** will route everything through VPN tunnel.
  {% endhint %}

<figure><img src="https://content.gitbook.com/content/pE5yODhpiy5pT1XxY0BS/blobs/AhrrYaEwTGhk1sN6vU3u/allowed-traffic-marked.png" alt=""><figcaption></figcaption></figure>

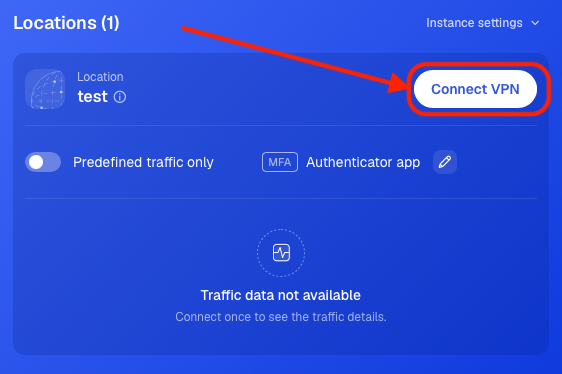
4. Click **Connect VPN**

<figure><img src="https://content.gitbook.com/content/pE5yODhpiy5pT1XxY0BS/blobs/1Fnu0pOfDEVOjVPvOIeo/connect-vpn-full-view.png" alt=""><figcaption></figcaption></figure>

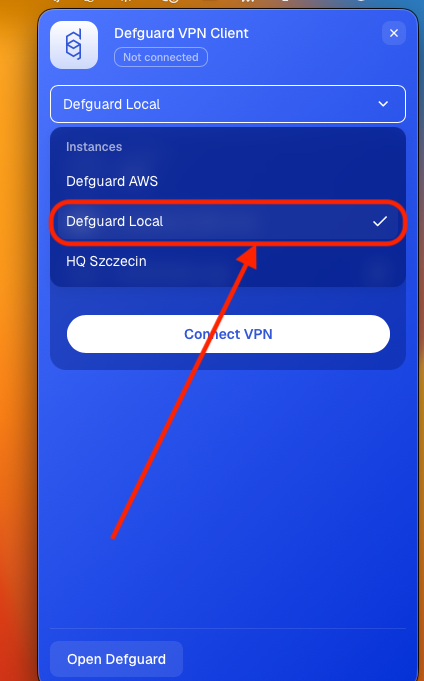
#### Desktop client in tray view mode

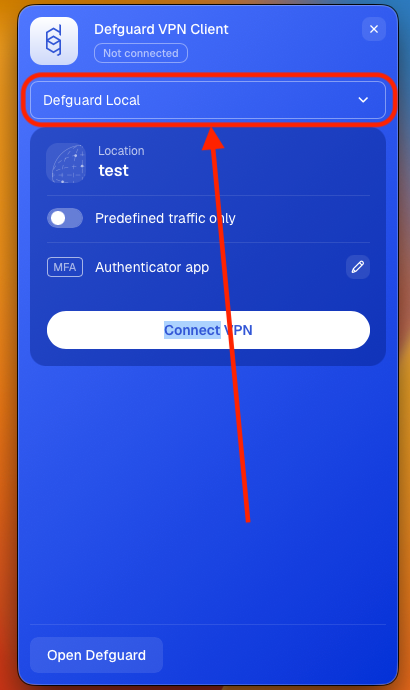
1. Click on instance list

<figure><img src="https://content.gitbook.com/content/pE5yODhpiy5pT1XxY0BS/blobs/zHdIx4ZRpFRRmzjQDFxv/instance-list-marked.png" alt=""><figcaption></figcaption></figure>

2. Select the instance you want to connect to

<figure><img src="https://content.gitbook.com/content/pE5yODhpiy5pT1XxY0BS/blobs/eylf9CP5rwW4Sg2HiEJe/selected-instance-on-list-marked.png" alt=""><figcaption></figcaption></figure>

3. Choose allowed traffic

{% hint style="info" %}

* **Predefined traffic only** will only route traffic specified by your administrator.
* **All traffic is allowed** will route everything through VPN tunnel.
  {% endhint %}

<figure><img src="https://content.gitbook.com/content/pE5yODhpiy5pT1XxY0BS/blobs/YLc8lAX4zT3NxO2uLAH7/allowed-traffic-tray-view.png" alt=""><figcaption></figcaption></figure>

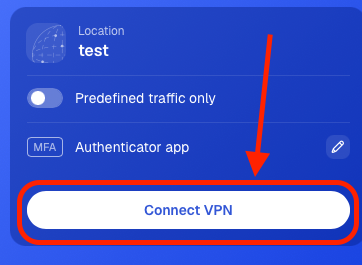
4. Click **Connect VPN**

<figure><img src="https://content.gitbook.com/content/pE5yODhpiy5pT1XxY0BS/blobs/qmSrGneFIficaLXrEdPr/connect-tray-view-marked.png" alt=""><figcaption></figcaption></figure>

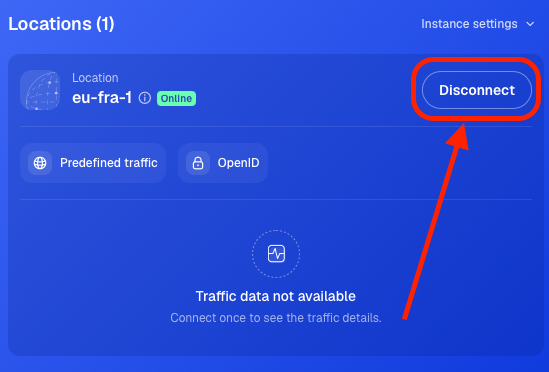
### Disconnecting from Instance

Click **Disconnect** next to the location you are currently connected to.

<figure><img src="https://content.gitbook.com/content/pE5yODhpiy5pT1XxY0BS/blobs/h2DNZag5xj5x0CKJ33lw/disconnect-marked.png" alt=""><figcaption></figcaption></figure>

### Updating Instance

If you want to update your instance manually:

1. If you don't have **Defguard** in full view mode, open **Defguard** from tray view, and click **Open Defguard**

<figure><img src="https://content.gitbook.com/content/pE5yODhpiy5pT1XxY0BS/blobs/gSvbFh6HU6TjHK3rC307/tray-view-open-defguard-marked.png" alt="" width="50%"><figcaption></figcaption></figure>

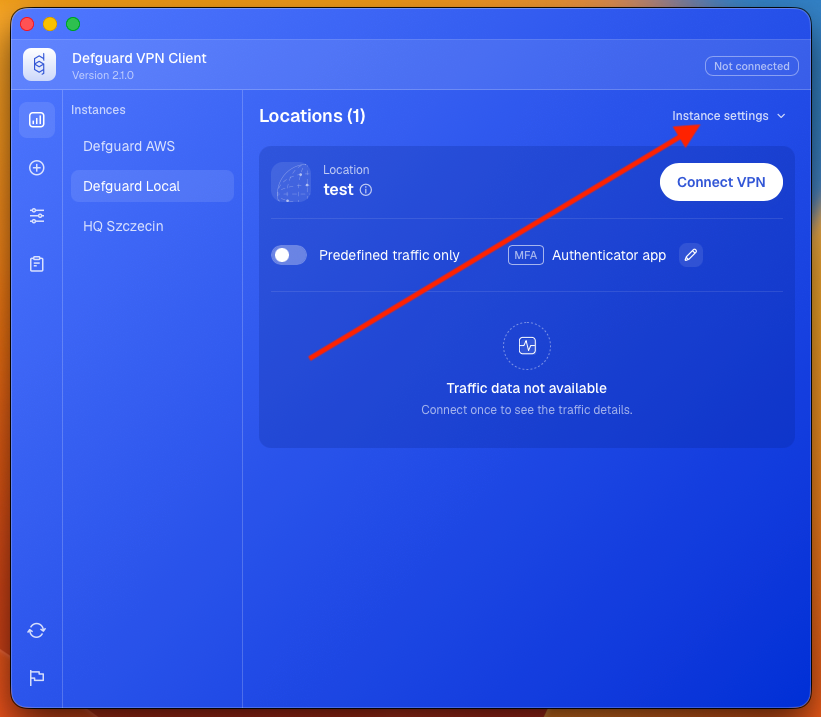
2. Go to your Instance and click **Instance settings**

<figure><img src="https://content.gitbook.com/content/pE5yODhpiy5pT1XxY0BS/blobs/vTVYbnBnIkEhX7mrgjBp/client-instance-settings-marked.png" alt=""><figcaption></figcaption></figure>

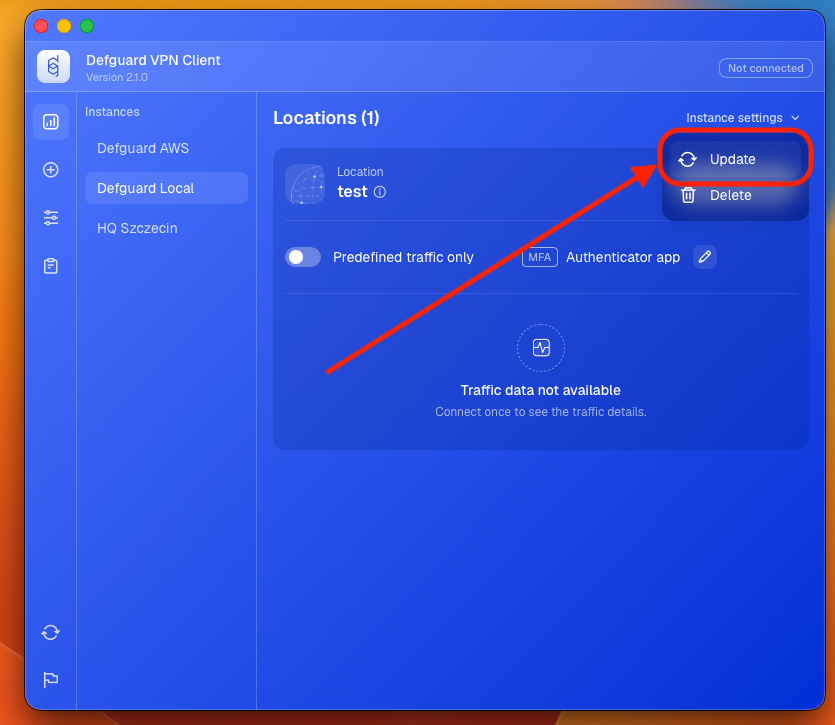
3. Click **Update**

<figure><img src="https://content.gitbook.com/content/pE5yODhpiy5pT1XxY0BS/blobs/iRxGDCSqzyYpDj0lWunm/update-marked-instance-settings.png" alt=""><figcaption></figcaption></figure>

{% hint style="warning" %}
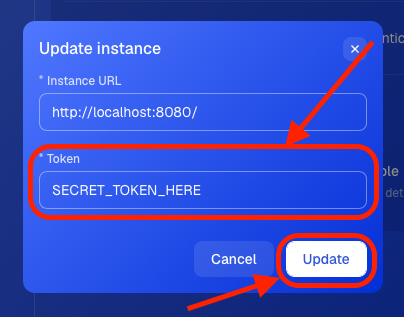
Only tokens issued from that specific instance will work.
{% endhint %}

4. Enter Token provided by your administrator, or generate it [on your own](#obtaining-url-and-token). Then click **Update**

<figure><img src="https://content.gitbook.com/content/pE5yODhpiy5pT1XxY0BS/blobs/nX8eNNvPs829EC0LpRVB/token-update-instance.png" alt=""><figcaption></figcaption></figure>

Your Instance will update immediately.

### Why do instances need updates?

Defguard Desktop stores all information locally and doesn't communicate with Defguard outside the registration process. This means that the information about an instance is a snapshot of the moment you registered it in the desktop client, and you might want to update it, for example when locations are added or removed.

{% hint style="success" %}
If you have a Business or Enterprise plan, all desktop clients and all instances are [synchronized automatically and in real-time.](/2.2/features/remote-user-enrollment/automatic-real-time-desktop-client-configuration.md)
{% endhint %}

### Removing Instance

1. If you don't have **Defguard** in full view mode, open **Defguard** from tray view, and click **Open Defguard**

<figure><img src="https://content.gitbook.com/content/pE5yODhpiy5pT1XxY0BS/blobs/gSvbFh6HU6TjHK3rC307/tray-view-open-defguard-marked.png" alt="" width="50%"><figcaption></figcaption></figure>

2. Go to your Instance, click **Instance settings**

<figure><img src="https://content.gitbook.com/content/pE5yODhpiy5pT1XxY0BS/blobs/vTVYbnBnIkEhX7mrgjBp/client-instance-settings-marked.png" alt=""><figcaption></figcaption></figure>

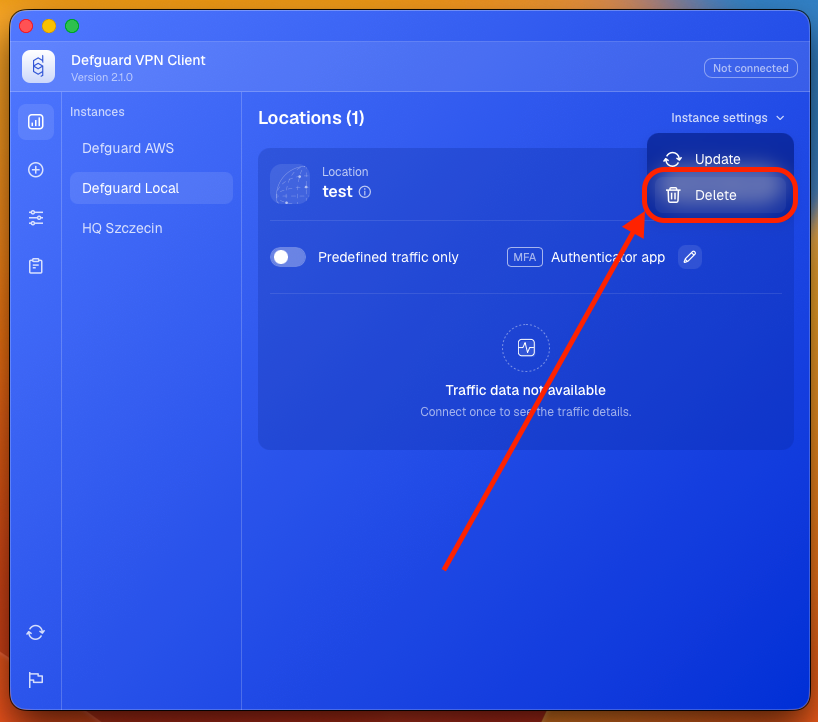
3. Click **Delete**

<figure><img src="https://content.gitbook.com/content/pE5yODhpiy5pT1XxY0BS/blobs/FGxk5GUpcsxwbwuB6hbK/delete-instance-marked.png" alt=""><figcaption></figcaption></figure>

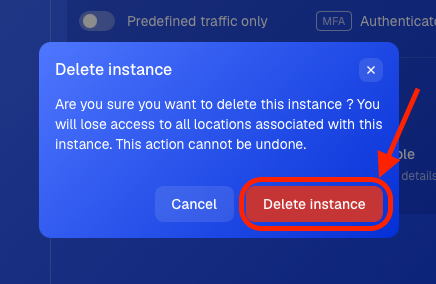
4. Confirm with **Delete instance** button

<figure><img src="https://content.gitbook.com/content/pE5yODhpiy5pT1XxY0BS/blobs/L8Fjno2UmWMjHZ4cfft4/delete-instance-confirmation.png" alt=""><figcaption></figcaption></figure>

Your Instance will be removed immediately.